环境:
- windows
- erlang-otp_win64_17
- rabbitmq 3.5.6
- Python 3.6.1
步骤:
1.erlang和rabbitmq安装,可以参考:
林旭的文章:《CentOS下安装JDK、NEXUS、TOMCAT、RABBITMQ集群》
2.安装pika1
2打开命令行,执行:
pip install pika
3.编写消费者receive.py
import pika
import random
while 1 :
    credentials = pika.PlainCredentials('guest', 'guest')
    #这里可以连接远程IP,请记得打开远程端口
    parameters = pika.ConnectionParameters('localhost',5672,'/',credentials)
    connection = pika.BlockingConnection(parameters)
    channel = connection.channel()
    #channel.queue_declare(queue='hello')
    body = input("Enter your input,To exit press CTRL+C: ");
    channel.basic_publish(exchange='',routing_key='hello',body=body)
    print (" [x] Sent %s" %body)
    connection.close()
4.编写生产者send.py
import pika
credentials = pika.PlainCredentials('guest', 'guest')
parameters = pika.ConnectionParameters('localhost',5672,'/',credentials    )
connection = pika.BlockingConnection(parameters)
channel = connection.channel()
channel.queue_declare(queue='hello')
print (' [*] Waiting for messages. To exit press CTRL+C' )
def callback(ch, method, properties, body):
    bodystr=body.decode('utf-8')
    print (" [x] Received %r" % (bodystr,))
channel.basic_consume(callback,queue='hello',no_ack=True)
channel.start_consuming()</pre>
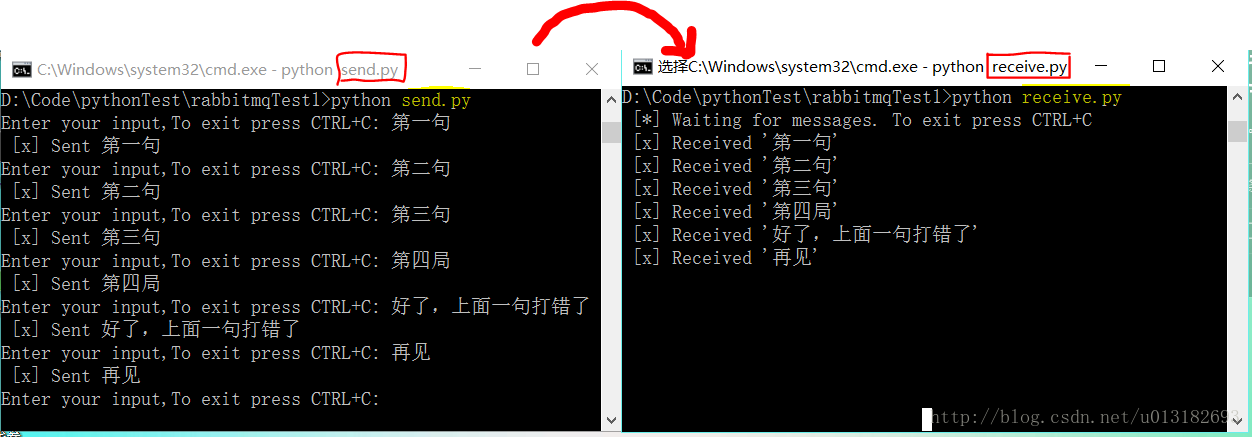
5.执行py脚本,结果如下:
本文作者:
夏军谊
本文链接: https://www.xiajunyi.com/pages/p30.html
版权声明:本作品采用知识共享署名-非商业性使用-相同方式共享 4.0 国际许可协议进行许可。转载请注明出处!
本文链接: https://www.xiajunyi.com/pages/p30.html
版权声明:本作品采用知识共享署名-非商业性使用-相同方式共享 4.0 国际许可协议进行许可。转载请注明出处!


