前言
本人初识微信小程序,是个实实在在的小白,经过简单的了解和参考github上的源码,最终将简单的公交查询小程序通过了腾讯的审核,成功上线。本文主要偏重于具体实现过程的介绍,自己写的部分代码并没有太多含金量,仅为给和我一样的小白们提供一个小程序开发到发布的参考。
背景
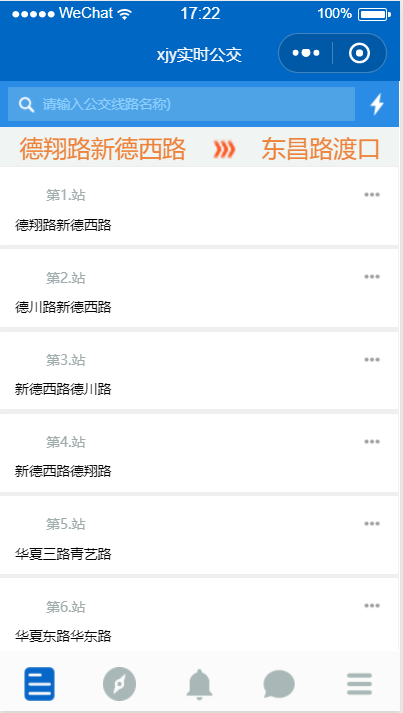
最开始想开发这个小程序的目的就是想方面自己每天走20分钟去坐公交时方便查询实时到站信息,虽然上海发布这类公共号已有相关功能,但是需要经过层层点击才能进入,我想做的是把我默认的线路放到首页直接展示。
简介
该程序和其他小程序一样,构成分为前端和后端两个部分,前端是在腾讯提供的微信小程序工具上开发完成,参考了github上的小程序源码《RebeccaHanjw/weapp-wechat-zhihu》,后端是在github上找到的python源码《ark930/shanghai-bus》。
开发
开发环境及工具
前端
- 操作系统:windows(我的笔记本电脑)
- 开发工具:微信web开发者工具
- 运行工具:微信小程序官方
后端
- 操作系统:centos(我的远程vps)
- 开发工具:略(这里是用的别人的源码)
- 运行工具:python3+flask
- 其他工具:nginx(负责域名到本地ip后的解析)
域名
- 域名商:阿里云
- 域名https代理:cloudflare
后端相关
现在后端服务被我组装成了docker镜像,如果省事也可以直接运行我发布的docker镜像《xiajunyi/smallbus》
安装python3及flask
这里的flask是为python提供的web框架
安装python3
1
yum install python3
安装flask,由于python3默认安装没有flask库,需要利用pip3安装
1
pip3 install flask
配置及运行python源码
从《ark930/shanghai-bus》下载源码到vps的目录,如果安装过git,可以用如下命令
1
git clone https://github.com/ark930/shanghai-bus.git
在源代码router.py文件中加入启动配置,如端口,是否开启调试等
1
2
3
if __name__ == '__main__':
app.config['JSON_AS_ASCII'] = False
app.run(host='127.0.0.1', port=8080, debug=False)运行
1
python3 router.py
新增域名解析配置
nginx配置中增加域名bus.xiajunyi.com的解析
1
2
3
4
5
6
7
8
9
10
11
12
13
14
15
16
17
server {
listen 80;
server_name bus.xiajunyi.com;
resolver 8.8.8.8;
location / {
proxy_pass $scheme://127.0.0.1:8080;
proxy_redirect $scheme://127.0.0.1:8080 $scheme://$host:80;
client_max_body_size 10m;
client_body_buffer_size 128k;
proxy_connect_timeout 90;
proxy_read_timeout 90;
proxy_buffer_size 4k;
proxy_buffers 6 128k;
proxy_busy_buffers_size 256k;
proxy_temp_file_write_size 256k;
}
}重启nginx生效
1
service nginx restart
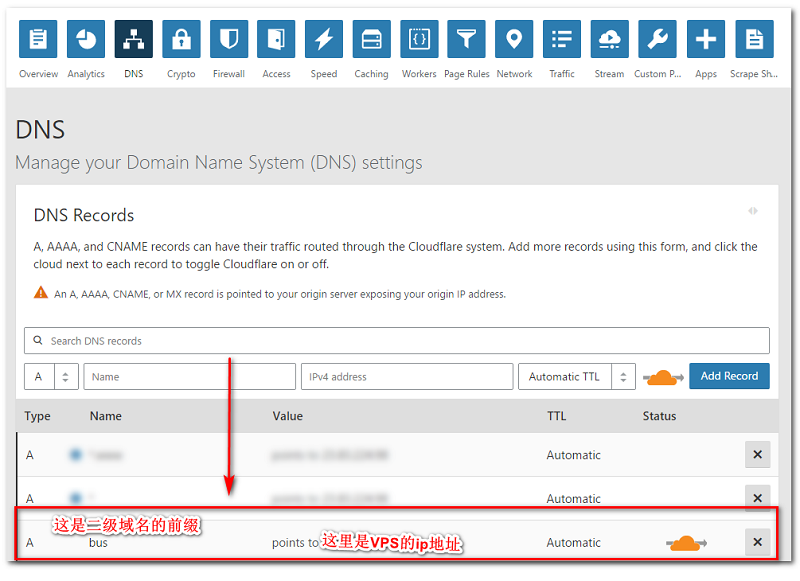
登录cloudflare,增加bus.xiajunyi.com到VPS上ip的解析
在此之前需要登录购买域名的阿里云,将其中的域名解析DNS的地址改为cloudflare提供的两个DNS,这样就相当于cloudflare代理了我的域名解析,它会为我提供免费的ssl证书认证功能,然后将https请求转化为http请求到我的VPS上的ip地址。

验证结果
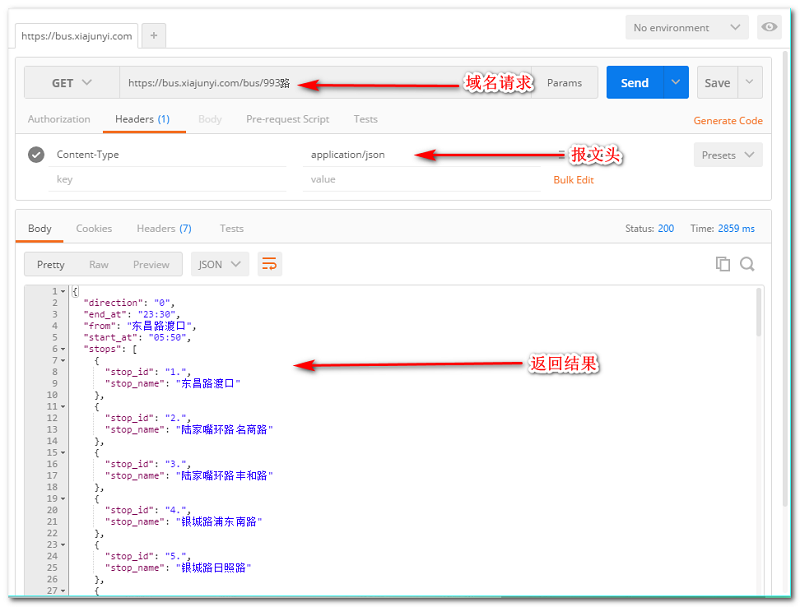
- 这时候就可以用postman工具尝试调用,有返回结果就证明后端发布成功了

前端相关
注册小程序及安装开发工具
这里有个小技巧!因为腾讯规定一个邮箱只能注册一个小程序,如果想注册多个小程序,可以使用QQ邮箱里的“绑定域名邮箱”功能,可以自定义多达200个你自己域名下的邮箱映射至自己的QQ邮箱。这样注册的邮箱居然不会被腾讯识别成同一个,哈哈,是不是感觉很过瘾?
具体注册过程和管理页面的配置,以及api文档,小程序官网介绍的已经很清楚,我就不详细介绍了,点这里查看相关文档
开发步骤
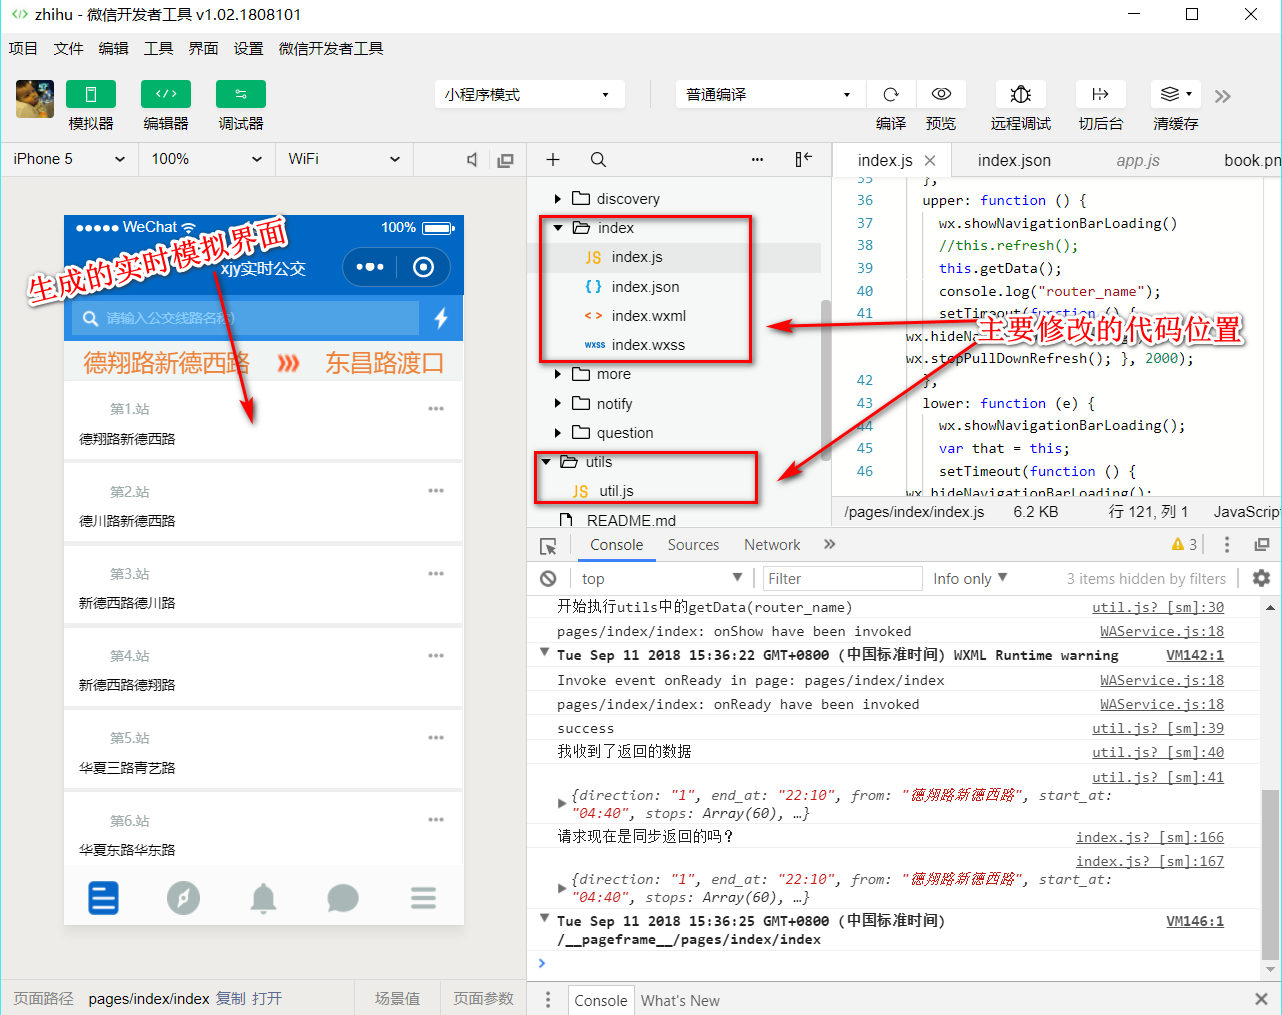
打开微信web开发者工具,在引导页面会让你导入下载的小程序源码,或者自己新建开发目录(如果是新建项目),然后输入项目的AppId(这个是在腾讯提供的小程序管理网页上获取的)即可进入,下面是进入后的开发界面

定义或修改index.wxml(类似于html)
1
2
3
4
5
6
7
8
9
10
11
12
13
14
15
16
17
18
19
20
21
22
23
24
25
26
27
28
29
30
31
32
33
34
35
36
37
38
39
40
41
<!--index.wxml-->
<scroll-view scroll-y="true" class="container" bindscrolltoupper="search_stop_e" upper-threshold="10" lower-threshold="5" bindscrolltoupper="upper-back" bindscrolltolower="lower" scroll-into-view="{{toView}}" scroll-top="{{scrollTop}}">
<!--省略一部分太长的代码-->
<!--明细显示-->
<block wx:for="{{feed}}" wx:for-index="idx" wx:for-item="item" data-idx="{{idx}}">
<view class="feed-item" data-detail_id="{{item.stop_id}}" bindtap="actualSearchTap">
<view class="feed-source">
<a class="">
<view class="avatar">
<image src="{{item.feed_source_img}}"></image>
</view>
<text>第{{item.stop_id}}站</text>
</a>
<image class="item-more" mode="aspectFit" src="../../images/more.png"></image>
</view>
<view class="feed-content">
<view class="question">
<a class="question-link">
<text class = "stopname" decode="{{true}}">{{item.stop_name}} </text>
</a>
<!--实时信息,只有在点击的时候才会显示-->
<view class="stopDetail">
<block wx:if="{{item.stop_id==search_stop_detail_touch+'.'}}">
<text decode="{{true}}">{{searchingInfo}}</text>
</block>
<block wx:if="{{item.stop_id==search_stop_detail+'.'}}">
<block wx:if="{{feedDetail.stop_interval==''}}">
<text decode="{{true}}">\n还没有发车</text>
</block>
<block wx:if="{{feedDetail.stop_interval!=''}}">
<text decode="{{true}}">\n还有:{{feedDetail.stop_interval}} 站 </text>
<text decode="{{true}}">时间:{{feedDetail.time}} 分钟 </text>
<text decode="{{true}}">距离:{{feedDetail.distance}} 米 </text>
</block>
</block>
</view>
</view>
</view>
</view>
</block>
</scroll-view>定义或修改index.wxss(类似于css样式),例如
1
2
3
4
5
6
7
8
9
10
11
12
13
14
15
16
17
18
19
20
/**index.wxss**/
.container{
height: 1500rpx;
}
.container .stopname {
font-size: 35rpx;
}
.container .search{
width: 735rpx;
height: 65rpx;
padding: 12.5rpx 0 12.5rpx 15rpx;
background: #2A8CE5;
}
.container .search-left{
flex: 8;
background: #4EA3E7;
text-align: left;
}定义或修改index.js(类似于javascript),定义触发的事件函数,例如
1
2
3
4
5
6
7
8
9
10
11
12
13
14
15
16
17
18
19
20
21
22
23
24
25
26
27
28
29
30
31
32
33
34
35
36
37
38
39
40
41
42
//index.js
var util = require('../../utils/util.js')
var app = getApp()
var router_name
Page({
data: {
feed: [1],
feedDetail: [1],
feed_length: 0,
router_name: 993,
},
//省略掉部分代码。。。
//获取实时的到站信息
getActualData: function (actualStop) {
console.log("现在在执行index里的getData()方法1?");
console.log(this.data.search_stop_detail);
console.log(this.data.feed);
console.log("正在载入实时信息");
this.setData({
searchingInfo: '正在拼命加载实时信息 ~~~'
});
var that = this;
util.getActualData(this.data.router_name, actualStop, this.data.direction).then(function (res) {
//请求成功的操作
console.log("详细请求现在是同步返回的吗?");
console.log(res.data);
console.log("详细现在请求的站点编号是" + actualStop);
var parseData = res.data;
parseData.time = parseInt(parseData.time / 60);
that.setData({
search_stop_detail: actualStop,
feedDetail: parseData,
searchingInfo: ''
});
console.log("间隔为");
console.log(that.data.feedDetail.stop_interval);
});
},
})修改index.json,定义一些公共变量,例如
1
2
3
4
5
6
7
{
"backgroundTextStyle": "dark",
"window": {
"enablePullDownRefresh": true
}
}修改utils.js定义查询公交路线和实时到站信息的函数
1
2
3
4
5
6
7
8
9
10
11
12
13
14
15
16
17
18
19
20
21
22
23
24
25
26
27
//省略掉部分代码。。。
//获取实时到站信息
function getActualData(router_name, stop_id, direction) {
console.log("开始执行utils中的getData(stop_id)");
return new Promise(function (resolve, reject) {
wx.request({
url: 'https://bus.xiajunyi.com/bus/' + router_name + '路/stop/' + stop_id + '?direction=' + direction,
data: {},
header: {
'Content-Type': 'application/json'
},
success: function (res) {
console.log("success");
console.log("我收到了返回的数据");
console.log(res.data);
resolve(res);
},
fail: function (res) {
reject(res);
console.log("failed");
}
})
})
}
module.exports.getData = getData;
module.exports.getActualData = getActualData;
审核发布
开发完成后,需要发布到腾讯的微信小程序系统中,并获得通过才能上线。
整个发布过程分为:
开发提交(开发版)–>审核通过(审核版)–>提交上线(上线版)
第一次审核通过可能需要几天时间,后面更新版本的审核基本上当天就能审核了,待上线发布后,大概10分钟左右就可以在微信app的小程序页面搜索到了。
总结
后端的发布,给我的感觉是restful型api的便捷性;前端微信小程序的开发,给我的印象是,如果api文档里了解到了整体架构,然后有相关的html、css、js基础,即可快速上手。虽然我的这个程序很low,但总归完整的完成了整个过程,这里暂时告一段落,后面有时间再深入研究微信小程序,准备加上定时提醒,通知到用户登等功能。
最后放上小程序的二维码,可以扫一扫哦:
本文链接: https://www.xiajunyi.com/pages/p50.html
版权声明:本作品采用知识共享署名-非商业性使用-相同方式共享 4.0 国际许可协议进行许可。转载请注明出处!


