简介
本文旨在记录一次ELK7.1.0为例的X-Pack插件破解实验,以及ELK和ldap的集成,文中方法均来自互联网,本人仅做研究学习,不做商用,特此申明!
参考文档链接:
反编译破解x-pack
查找自己版本的jar包
1 | ls /usr/share/elasticsearch/modules | grep x-pack-core |
取出jar包
1 | ll /usr/share/elasticsearch/modules/x-pack-core/x-pack-core-7.1.0.jar |
反编译并重新打jar包
我们需要把2个文件提取出来进行修改。org.elasticsearch.license.LicenseVerifier和org.elasticsearch.xpack.core.XPackBuild
修改LicenseVerifier.java
LicenseVerifier中有两个静态方法,这就是验证授权文件是否有效的方法,我们把它修改为全部返回true.1
2
3
4
5
6
7
8
9
10
11
12
13
14
15
16
17
18
19
20
21
22
23
24
25
26
27
28
29
30
31
32
33
34
35
36
37
38
39
40
41
42
43
44
45
46
47
48
49
50
51
52
53
54
55
56
57
58
59
60
61
62
63
64
65
66
67
68
69
70
71
72
73
74
75
76
77
78
79
80
81
82
83
84
85
86
87
88package org.elasticsearch.license;
import java.nio.*;
import org.elasticsearch.common.bytes.*;
import java.security.*;
import java.util.*;
import org.elasticsearch.common.xcontent.*;
import org.apache.lucene.util.*;
import org.elasticsearch.core.internal.io.*;
import java.io.*;
public class LicenseVerifier
{
public static boolean verifyLicense(final License license, final byte[] publicKeyData) {
/* byte[] signedContent = null;
byte[] publicKeyFingerprint = null;
try {
final byte[] signatureBytes = Base64.getDecoder().decode(license.signature());
final ByteBuffer byteBuffer = ByteBuffer.wrap(signatureBytes);
final int version = byteBuffer.getInt();
final int magicLen = byteBuffer.getInt();
final byte[] magic = new byte[magicLen];
byteBuffer.get(magic);
final int hashLen = byteBuffer.getInt();
publicKeyFingerprint = new byte[hashLen];
byteBuffer.get(publicKeyFingerprint);
final int signedContentLen = byteBuffer.getInt();
signedContent = new byte[signedContentLen];
byteBuffer.get(signedContent);
final XContentBuilder contentBuilder = XContentFactory.contentBuilder(XContentType.JSON);
license.toXContent(contentBuilder, (ToXContent.Params)new ToXContent.MapParams((Map)Collections.singletonMap("license_spec_view", "true")));
final Signature rsa = Signature.getInstance("SHA512withRSA");
rsa.initVerify(CryptUtils.readPublicKey(publicKeyData));
final BytesRefIterator iterator = BytesReference.bytes(contentBuilder).iterator();
BytesRef ref;
while ((ref = iterator.next()) != null) {
rsa.update(ref.bytes, ref.offset, ref.length);
}
return rsa.verify(signedContent);
}
catch (IOException ex) {}
catch (NoSuchAlgorithmException ex2) {}
catch (SignatureException ex3) {}
catch (InvalidKeyException e) {
throw new IllegalStateException(e);
}
finally {
if (signedContent != null) {
Arrays.fill(signedContent, (byte)0);
}
}
*/
return true;
}
public static boolean verifyLicense(final License license) {
/*
byte[] publicKeyBytes;
try {
final InputStream is = LicenseVerifier.class.getResourceAsStream("/public.key");
try {
final ByteArrayOutputStream out = new ByteArrayOutputStream();
Streams.copy(is, (OutputStream)out);
publicKeyBytes = out.toByteArray();
if (is != null) {
is.close();
}
}
catch (Throwable t) {
if (is != null) {
try {
is.close();
}
catch (Throwable t2) {
t.addSuppressed(t2);
}
}
throw t;
}
}
catch (IOException ex) {
throw new IllegalStateException(ex);
}
//return verifyLicense(license, publicKeyBytes);
*/
return true;
}
}修改XPackBuild.java
XPackBuild中最后一个静态代码块中 try的部分全部删除,这部分会验证jar包是否被修改.1
2
3
4
5
6
7
8
9
10
11
12
13
14
15
16
17
18
19
20
21
22
23
24
25
26
27
28
29
30
31
32
33
34
35
36
37
38
39
40
41
42
43
44
45
46
47
48
49
50
51
52
53
54
55
56
57
58
59
60
61
62
63
64
65
66
67
68
69
70
71
72
73
74
75package org.elasticsearch.xpack.core;
import org.elasticsearch.common.io.*;
import java.net.*;
import org.elasticsearch.common.*;
import java.nio.file.*;
import java.io.*;
import java.util.jar.*;
public class XPackBuild
{
public static final XPackBuild CURRENT;
private String shortHash;
private String date;
(reason = "looks up path of xpack.jar directly")
static Path getElasticsearchCodebase() {
final URL url = XPackBuild.class.getProtectionDomain().getCodeSource().getLocation();
try {
return PathUtils.get(url.toURI());
}
catch (URISyntaxException bogus) {
throw new RuntimeException(bogus);
}
}
XPackBuild(final String shortHash, final String date) {
this.shortHash = shortHash;
this.date = date;
}
public String shortHash() {
return this.shortHash;
}
public String date() {
return this.date;
}
static {
final Path path = getElasticsearchCodebase();
String shortHash = null;
String date = null;
Label_0109: {
/* if (path.toString().endsWith(".jar")) {
try {
final JarInputStream jar = new JarInputStream(Files.newInputStream(path, new OpenOption[0]));
try {
final Manifest manifest = jar.getManifest();
shortHash = manifest.getMainAttributes().getValue("Change");
date = manifest.getMainAttributes().getValue("Build-Date");
jar.close();
}
catch (Throwable t) {
try {
jar.close();
}
catch (Throwable t2) {
t.addSuppressed(t2);
}
throw t;
}
break Label_0109;
}
catch (IOException e) {
throw new RuntimeException(e);
}
}
*/
shortHash = "Unknown";
date = "Unknown";
}
CURRENT = new XPackBuild(shortHash, date);
}
}生成.class文件
上述
LicenseVerifier.java和XPackBuild.java两个文件在本地电脑windows修改完成后,我们需要将其复制到elasticsearch服务器上并编译成class文件,然后打包到x-pack-core-7.1.0.jar中。我们这里将这2个文件放到了/opt目录下。1
2
3
4
5
6
7
8
9
10# 编译LicenseVerifier.java
$ javac -cp "/usr/share/elasticsearch/lib/elasticsearch-7.1.0.jar:/usr/share/elasticsearch/lib/lucene-core-8.0.0.jar:/usr/share/elasticsearch/modules/x-pack-core/x-pack-core-7.1.0.jar:/usr/share/elasticsearch/modules/x-pack-core/netty-common-4.1.32.Final.jar:/usr/share/elasticsearch/lib/elasticsearch-core-7.1.0.jar" /opt/LicenseVerifier.java
# 编译XPackBuild.java
$ javac -cp "/usr/share/elasticsearch/lib/elasticsearch-7.1.0.jar:/usr/share/elasticsearch/lib/lucene-core-8.0.0.jar:/usr/share/elasticsearch/modules/x-pack-core/x-pack-core-7.1.0.jar:/usr/share/elasticsearch/modules/x-pack-core/netty-common-4.1.32.Final.jar:/usr/share/elasticsearch/lib/elasticsearch-core-7.1.0.jar:" /opt/XPackBuild.java
# 查看编译后的文件
$ ls /opt | grep .class
LicenseVerifier.class
XPackBuild.class替换LicenseVerifier.class和XPackBuild.class
我们把/usr/share/elasticsearch
/modules/x-pack-core目录下的x-pack-core-7.1.0.jar提取出来,放到一个临时的/elk/x-pack目录中。1
2
3
4
5
6
7
8$ cp /usr/share/elasticsearch/modules/x-pack-core/x-pack-core-7.12.0.jar /opt/x
$ cd /opt/x
# 解压x-pack-core-7.1.0.jar
$ jar -xvf x-pack-core-7.1.0.jar
# 替换.class文件
$ cp /opt/XPackBuild.class /opt/x-pack-core-7.1.0/org/elasticsearch/xpack/core/
$ cp /opt/LicenseVerifier.class /opt/x-pack-core-7.1.0/org/elasticsearch/license/打包新x-pack-core-7.1.0.jar文件
1
2
3$ cd /opt/x
$ rm -rf x-pack-core-7.1.0.jar # 删除临时拷贝过来的源文件
$ jar cvf x-pack-core-7.1.0.jar . #“.”表示全选文件至此在/elk/x-pack目录下会新生成一个
x-pack-core-7.1.0.jar文件。也就是破解后的文件。替换x-pack-core-7.1.0.jar文件
我们将新生成的x-pack-core-7.1.0.jar文件文件替换掉源x-pack-core-7.1.0.jar文件。
1
2cp /opt/x-pack-core-7.1.0/x-pack-core-7.1.0.jar /usr/share/elasticsearch/modules/x-pack-core/
rm -rf /elk/x-pack # 完成文件替换后该目录既可以删除了
激活License
申请License
完成以上步骤后,需要去elastic官网申请一个license, License申请地址,申请个一年的免费license,申请完成后会发送文件到你的邮箱中,打开后:
点击Download the license for Elasticsearch 5.x/6.x,
编辑License
下载后打开这个文件,并将该License的type、expiry_date_in_millis、max_nodes分别修改成platinum、2524579200999、1000。
1 | { |
传入License
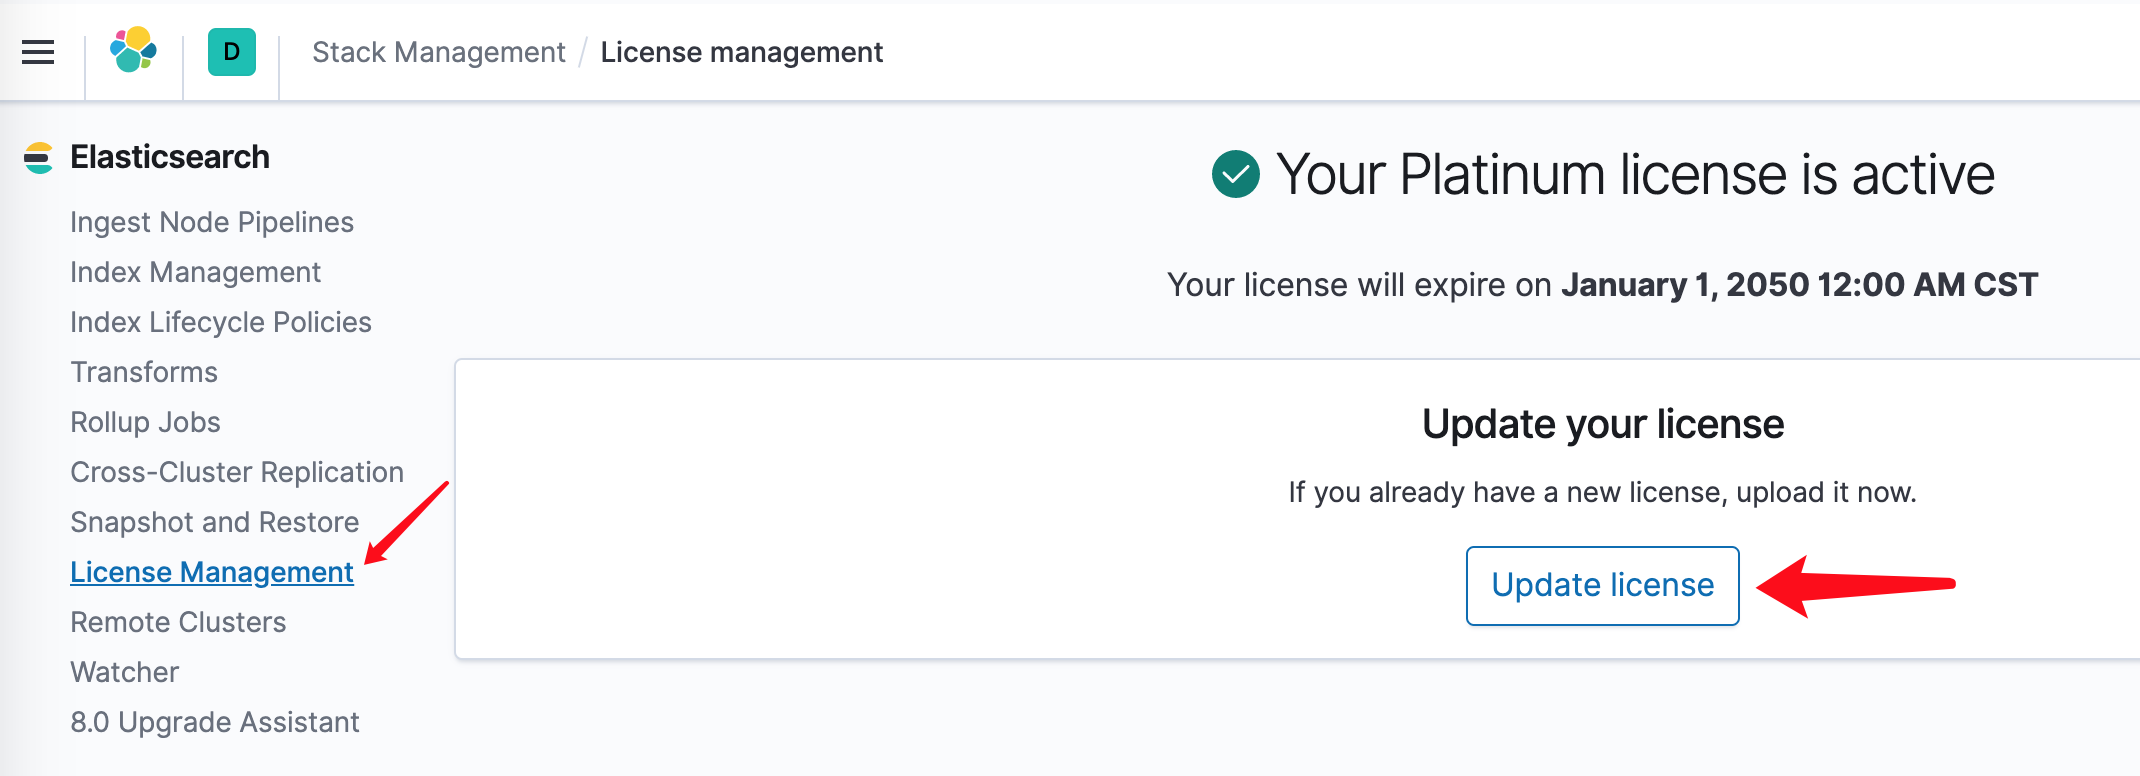
再将这个License的json文件通过kibana上传上去即可。
开启x-pack安全认证
在config/elasticsearch.yml中配置x-pack安全认证
1 | xpack.security.transport.ssl.enabled: true |
设置密码
交互设置密码(建议都设置成同一个方便记忆):
1 | bin/elasticsearch-setup-passwords interactive |
集成ldap
在config/elasticsearch.yml中配置ldap
1
2
3
4
5
6
7
8xpack.security.authc.realms.ldap.ldap1.order: 0
xpack.security.authc.realms.ldap.ldap1.url: "ldap://xxx-openldap:389"
xpack.security.authc.realms.ldap.ldap1.bind_dn: "cn=admin,dc=xxx,dc=com"
xpack.security.authc.realms.ldap.ldap1.bind_password: "xxxxxx"
xpack.security.authc.realms.ldap.ldap1.user_search.base_dn: "ou=elk,dc=xxx,dc=com"
xpack.security.authc.realms.ldap.ldap1.user_search.filter: "(cn={0})"
xpack.security.authc.realms.ldap.ldap1.group_search.base_dn: "ou=elk,dc=xxx,dc=com"
xpack.security.authc.realms.ldap.ldap1.unmapped_groups_as_roles: false使用kibana新建个测试的角色test-role
给ldap用户组绑定角色,去kibana的devTools里执行:
1
2
3
4
5
6
7
8curl -X POST "localhost:9200/_xpack/security/role_mapping/users" -u elastic:密码 -H 'Content-Type: application/json' -d'
{
"roles": [ "test-role" ],
"enabled": true,
"rules": {
"field" : { "dn" : "*,ou=elk,dc=xxx,dc=com" }
}
}查看角色绑定关系
1
curl "localhost:9200/_xpack/security/role_mapping?pretty" -u elastic:密码
总结
本文所有内容仅供个人学习,请勿用于商业用途,谢谢!
本文链接: https://www.xiajunyi.com/pages/p86.html
版权声明:本作品采用知识共享署名-非商业性使用-相同方式共享 4.0 国际许可协议进行许可。转载请注明出处!


